This project contains the code which demonstrates the integration of smart home devices with the Google Assistant
using a Firebase backend.
Refer to the video below for step by step guidelines.
- Go to the Actions on Google Developer Console.
- Click New Project, enter a name for the project, and click CREATE PROJECT.
- Select the Smart Home App.
- On the Overview screen in the Actions console, select Smart home.
- Choose the Smart home experience card, and you will then be directed to your project console.
- Download and install Node.js from https://nodejs.org/en/download/.
- To install the firebase CLI, run the following npm command from the terminal:
sudo npm install -g firebase-tools - To verify that the CLI has been installed correctly, run:
firebase --version - Authorize the Firebase CLI with your Google account by running:
firebase login - Install git and clone the project using:
sudo apt-get install git git clone https://github.com/shivasiddharth/google-actions-smarthome - Change directory using:
cd /google-actions-smarthome/smarthome-control/functions/ - Navigate to the Google Cloud Console API Manager for your project id.
- Enable the HomeGraph API.
- Navigate to the Google Cloud Console API & Services page.
- Select Create Credentials and create a Service account key.
- Create a new Service account.
- Use the role Service Account > Service Account Token Creator.
- Create the account and download a JSON file. Save this in the functions folder as smart-home-key.json
- Connect to firebase using:
firebase use <project-id> - Deploy firebase using:
sudo npm install firebase deploy - In the Actions console under Overview > Build your Action, select Add Action(s). Enter the URL for your cloud function that provides fulfillment for the smart home intents and click Save.
https://us-central1-<project-id>.cloudfunctions.net/smarthome - On the Develop > Invocation tab, add a Display Name for your Action, and click Save. This name will appear in the Google Home app.
- To enable Account linking, select the Develop > Account linking option in the left navigation. Use these account linking settings:
Client ID : ABC123 Client secret : DEF456 Authorization URL : https://us-central1-<project-id>.cloudfunctions.net/fakeauth Token URL : https://us-central1-<project-id>.cloudfunctions.net/faketoken - Click Save to save your account linking configuration, then click Test to enable testing on your project.
- To link to Google Assistant:
- On your phone, open the Google Assistant settings. Note that you should be logged in as the same account as in the console.
- Navigate to Google Assistant > Settings > Home Control (under Assistant).
- Select the plus (+) icon in the bottom right corner.
- You should see your test app with the [test] prefix and the display name you set.
- Select that item. The Google Assistant will then authenticate with your service and send a SYNC request, asking your service to provide a list of devices for the user.
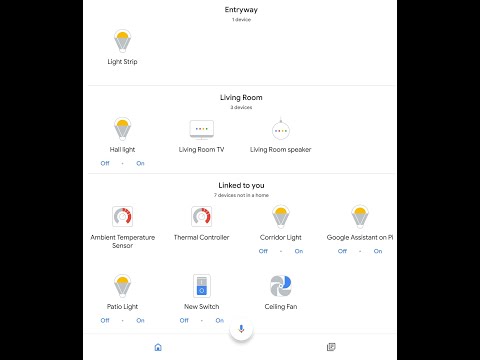
- Now pre-programmed devices will appear in the Google Home app.
The codes in this project will create the following devices:
- 1 RGB light with brightness, color and on/off control.
- 1 Normal light with brightness and on/off control.
- 1 Fan with speed and on/off control (speed control trait is currently disabled by google hence the corresponding segments of codes have been commented out).
- 1 Thermostat with mode change and temperature control.
- 1 Temperature sensor device with temperature readout only.
- 1 Plug/Switch.
- The devices have been declared for SYNC
- The QUERY for the corresponding devices
- The EXECUTE for the corresponding devices
- The REPORT STATE for the corresponding devices
- OK Google, "Set thermostat to heat mode".
- Ok Google, "Set thermostat to 10 degrees".
- Ok Google, "Set lights to Green color".
- Ok Google, "Set light to 20% Brightness".
- Do not install the json version 6 library as it is not currently compatible.
- Install the library Arduinojson vers:5.13.0
- Install the library Firebase Arduino from here: https://github.com/FirebaseExtended/firebase-arduino.git
- This project works with the core version esp8266 2.5.2
Copyright 2018 Google Inc.
Licensed to the Apache Software Foundation (ASF) under one or more contributor license agreements. See the NOTICE file distributed with this work for additional information regarding copyright ownership. The ASF licenses this file to you under the Apache License, Version 2.0 (the "License"); you may not use this file except in compliance with the License. You may obtain a copy of the License at
http://www.apache.org/licenses/LICENSE-2.0
Unless required by applicable law or agreed to in writing, software distributed under the License is distributed on an "AS IS" BASIS, WITHOUT WARRANTIES OR CONDITIONS OF ANY KIND, either express or implied. See the License for the specific language governing permissions and limitations under the License.